Rails+Ajax+コメント機能を実装! Railsポートフォリオ制作日記②
日記のくせに書く頻度が少ないかな。
という事で、コメント機能を実装してみたのでまとめていきます。
レッツゴー
またこちらの記事を参考にしてほとんど一緒になってしまいましたが自分なりに書いたのでご了承ください。
前提
ーーーーーーーーーーーーーーーーーーーーーーーーーーーーーーーーーーーーーーー
前提として、投稿詳細ページへのコメントを実装しました。
デザインもやっていないのでカスタマイズは自分流にアレンジして下さいね。
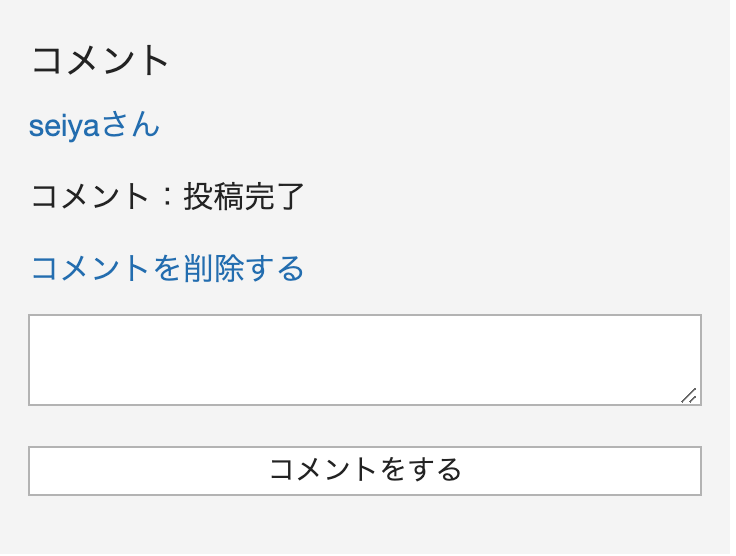
完成イメージはこんな感じです!

また、コメントを表示するページ(僕の場合はshowページ)の実装と、JQueryの読み込みはできてる前提で行きます!
2 コメントテーブル作成
ーーーーーーーーーーーーーーーーーーーーーーーーーーーーーーーーーーーーーーー
$ rails g model comment content:string user:references micropost:references
UserモデルとMicropostモデルと関連づけるためreferencesも書く。
config/db/schema.rb
t.string "content"t.bigint "user_id"t.bigint "micropost_id"t.datetime "created_at", null: falset.datetime "updated_at", null: falseend
うん。しっかりとuser_idとmicropost_idがある。
ちなみに、『micropost_id』がどの投稿に対するコメントであるかを格納するためで
『user_id』が誰の投稿であるかを格納するためになります。
安心できたところで忘れずに
$ rails db:migrate
3 モデルの設定
ーーーーーーーーーーーーーーーーーーーーーーーーーーーーーーーーーーーーーーー
app/models/comment.rb
class Comment < ApplicationRecordbelongs_to :userbelongs_to :micropostvalidates :content, presence: trueend
例えばコメント①はただ1人のユーザーとただ1つの投稿に結びつく1対1の関係であるため『belongs_to』で結びつけます。
app/models/user.rb
class User < ApplicationRecordhas_many :microposts, dependent: :destroyhas_many :comments, dependent: :destroy
app/models/micropost.rb
class Micropost < ApplicationRecordbelongs_to :userhas_many :comments, dependent: :destroy
逆にUserモデルやMicropostモデルは1人のユーザーが何個もコメントする事ができ、1つの投稿は何個もコメントを持つ事ができる1対多の関係であるため『has_many』で結びます。また、『dependent: :destroy』は投稿が消えたらコメントもついでに消してね。って伝えてます。
4 ルーティング
ーーーーーーーーーーーーーーーーーーーーーーーーーーーーーーーーーーーーーーー
config/routes.rb
resources :microposts, only: [:new, :show, :index, :create, :destroy] doresources :comments, only: [:create, :destroy]end
コメントがどの投稿にされたかを識別するため、ルーティングのURLに投稿のIDが
必要になります。つまり『/micropost/1/comment/』こんな感じにしたい。
そのためにはルーティングをこのように記述する必要がある。(ネストすると言う)
ちなみにこの1は『micropost_id』のこと。
5 コメントコントローラー
ーーーーーーーーーーーーーーーーーーーーーーーーーーーーーーーーーーーーーーー
app/controllers/comment.rb
class CommentsController < ApplicationControllerdef create@micropost = Micropost.find(params[:micropost_id]) #1@comment = @micropost.comments.build(comment_params) #2@comment.user_id = current_user.id #3if @comment.saverender :comments #4endend
def destroy@comment = Comment.find(params[:id]) #5if @comment.destroyrender :comments #6endend
privatedef comment_paramsparams.require(:comment).permit(:content)endend
#1:コメントをする対象の投稿(micropost)のインスタンスを作成します。
#2:「.build」を使うことで、@micropostのidをmicropost_idに含んだ形でcommentインスタンスを作成します。
#3:現在のuserのidを入れます。
#4:保存がされると、render :commentsによって「app/views/comments/comment.js.erb」を探しにいきます。
「form_with」でフォームを送信した時は、デフォルトでjsファイルを探しにいく設定になっています。
htmlファイルを探しにいってほしい場合には、form_withの後に「local: true」と記載する必要があります。
#5:削除する対象のコメントインスタンスを探します。
#6:削除がされると、「comments.js.erb」を探しにいきます。
削除のリンクを記載している「link_to」の中に「remote: true」を記載していることでjsファイルを探しにいってくれます。
7. app/views/comments/_comments.html.erb に記載しています。
「remote: true」を記載していなかった場合は、htmlファイルを探しにいきます。
6 投稿のコントローラー
ーーーーーーーーーーーーーーーーーーーーーーーーーーーーーーーーーーーーーーー
app/controllers/microposts_controller.rb
def show@micropost = Micropost.find(params[:id])@comment = Comment.new #1@comments = @micropost.comments #2end
どちらも、7. 投稿のビュー「app/views/microposts/show.html.erb」でパーシャルに渡す変数として使用します。
#1:入力フォームで使用するインスタンスを作成しています。
#2:コメント一覧表示で使用するためのコメントデータを入れています。
つまり下準備の段階です。
7 投稿のビューページ
ーーーーーーーーーーーーーーーーーーーーーーーーーーーーーーーーーーーーーーー
app/views/microposts/show.html.erb
<div><h4>コメント</h4><div id="comments_area"> #1←こいつがのちに重要になる#コメント一覧を表示させるrender#<%= render partial: 'comments/comments', locals: { comments: @comments } %></div><% if user_signed_in? %>#コメント入力フォームを表示させるためのrender#<%= render partial: 'shared/comments_form', locals: { comment: @comment, micropost: @micropost } %><% end %></div>
#1:「id="comments_area"」がポイントです。
このidをターゲットにして、このdiv内をAjaxで書き換えます。
このdivの内側に、renderを使ってパーシャルを表示します。
@commentをパーシャル内で使うローカル変数commentとして渡しています。
8 パーシャル部分のビュー
ーーーーーーーーーーーーーーーーーーーーーーーーーーーーーーーーーーーーーーー
app/views/comments/_comments.html.erb
<% comments.each do |comment| %><p><%= link_to "#{comment.user.name}さん", "#" %></p><p>コメント:<%= comment.content %></p><% if comment.user == current_user %><p><%= link_to 'コメントを削除する', micropost_comment_path(comment.micropost_id, comment.id), method: :delete, remote: true %></p><% end %><% end %><% end %>
先ほど投稿のビューで渡したローカル変数(comments)をeach分で渡してあげてコメントがあれば全てを表示させるようにします。
ポイントは、コメントの削除のところで「(comment.micropost_id, comment.id)」と投稿のidとコメントのidを渡す必要があることと、5. コメントコントローラーのところでも触れましたが「remote: true」をつけることによって、コントローラーでjsファイルを探しにいってもらうことです。
idをcomment.micropost_idとcomment.idの2つ渡す必要があるのは、削除したいコメントを指定するには「micropost/1/comment/1」のようにmicropost_idとcomment_idを指定する必要があるためです。
app/views/comments/comments_form.html.erb
<%= form_with(model: [micropost, comment] ) do |form| %><div><%= form.text_area :content %></div><div class="actions"><%= form.submit "コメントをする" %></div><% end %>
ポイントは、「model: [micropost, comment]」とすることです。
micropost, commentはそれぞれ、7. 投稿のビューで渡しているインスタンスのローカル変数です。
投稿に紐づいたコメントを生成するため、ここでpost、microcommentのインスタンスを渡すことが必要になります。
9 jsファイル
ーーーーーーーーーーーーーーーーーーーーーーーーーーーーーーーーーーーーーーー
app/views/comments/comments.js.erb
$("#comments_area").html("<%= j(render 'comments', { comments: @comment.micropost.comments }) %>")$("textarea").val('')
このファイルに、7. 投稿のビューの中で id = "comments_area"とした箇所を書き換える処理を記載しています。
「$("#comments_area")」が id = "comments_area"をターゲットとする記載です。
ターゲットとした箇所を、「render 'comments'」で指定している8. パーシャル部分のビューの内容で書き換えています。
{ comments: @comment.micropost.comments }で、@comment.micropost.comments をローカル変数 comments に入れて渡しています。
@comment.micropost.comments は、コメント一覧表示するのに必要なコメント全件です。
「$("textarea").val('')」によって、コメント入力後のコメント入力欄を空にしています。
10 最後に
ーーーーーーーーーーーーーーーーーーーーーーーーーーーーーーーーーーーーーーー
ほとんど書いてあること同じじゃねーかあ!!って言われても仕方ありませんがこれはあくまで自分自身が忘れないためにまとめていますので大目にみてください。
おそらく、この通りにやってもうまくいかないこともあると思います。
そんなことで諦めず、あーでもないコーデもないと試行錯誤しながらやっていくうちに機能するようになります。(きっとね)
その達成感と行ったら一人でガッツポーズしちゃうぐらいだから相当嬉しいよね。
だからやめられない。
という事でこれ書いてたらもう夜中の3時だから寝なきゃだね。
それじゃあおやすみ
Devise+フォロー、アンフォロー機能の実装をしていこう!
遅かれ早かれ、やっとフォロー、アンフォローまでの実装が終わりました。
今回Deviseを使って実装するのが初めてだったのでまとめておきます!
これを見た人は参考までにどうぞ。
こちらの記事を参考にしほとんど一緒の内容になってしまいますが、若干違う場所もあります。
それではレッツラゴー
モデルの作成
ーーーーーーーーーーーーーーーーーーーーーーーーーーーーーーーーーーーーーーー
$ rails generate model Relationship follower_id:integer followed_id:integer
def changecreate_table :relationships do |t|t.integer :follower_idt.integer :followed_idt.timestamps null: falseendadd_index :relationships, :follower_idadd_index :relationships, :followed_idadd_index :relationships, [:follower_id, :followed_id], unique: trueendend
マイグレーションファイルが作成されるので黄色の箇所の複合キーインデックスを付け足す。ここでは、同じユーザーが2回以上同じ人をフォロー出来ないように防いでいる。
そしていつも通り
$ rails db:migrate
UserとRelationshiipの関連付け
ーーーーーーーーーーーーーーーーーーーーーーーーーーーーーーーーーーーーーーー
app/models/rerationship.rb
class Relationship < ApplicationRecordbelongs_to :follower, class_name: "User"belongs_to :followed, class_name: "User"validates :follower_id, presence: truevalidates :followed_id, presence: trueend
下の2行でついでにバリデーションも設定
app/models/user.rb
has_many :active_relationships, class_name: "Relationship",foreign_key: "follower_id",dependent: :destroyhas_many :passive_relationships, class_name: "Relationship",foreign_key: "followed_id",dependent: :destroyhas_many :following, through: :active_relationships, source: :followedhas_many :followers, through: :passive_relationships, source: :follower# ユーザーをフォローするdef follow(other_user)active_relationships.create(followed_id: other_user.id)end# ユーザーをアンフォローするdef unfollow(other_user)active_relationships.find_by(followed_id: other_user.id).destroyend# 現在のユーザーがフォローしてたらtrueを返すdef following?(other_user)following.include?(other_user)endend
仮装的にUserモデルを2つに分けるためにactive_rerationshipsとpassive_rerationshipsという別名をつけます。
followiing,followersはそれぞれsourceから名前を上書きしています。followingによる関連付けを使ってfollow,unfollow,following?メソッドを作成していきます。ここではUserは2つとなるのでselfではなくother_userを使います。
ルーティング
ーーーーーーーーーーーーーーーーーーーーーーーーーーーーーーーーーーーーーーー
resources :users do
member do
get :following, :followers
end
end
とすることで

このようなURLが使えるようになりましたが、今回はDeviseを使ってるので
devise_scope :user doget 'users/:id/' => 'users/registrations#show', as: 'show'get 'users/:id/following', to: 'users/registrations#following', as: 'following'get 'users/:id/followers', to: 'users/registrations#followers', as: 'followers'endresources :relationships, only: [:create, :destroy]end
このように自分で2つのgetリクエストを作ってあげます。こうすることでチュートリアルと同じものがDevise上でも出来上がります。
あとはrelationshipのresourcesもお忘れなく!
必要なテンプレートの作成
ーーーーーーーーーーーーーーーーーーーーーーーーーーーーーーーーーーーーーーー
今回はajaxでの実装をしていく形になります。
まずは、フォロワーの統計情報を表示するパーシャルを作成します。
app/views/users/shared/_stats.html.erb
<% @user ||= current_user %><div class="stats"><a href="<%= following_path(@user) %>">フォロー<strong id="following" class="stat"><%= @user.following.count %></strong></a><a href="<%= followers_path(@user) %>">フォロワー<strong id="followers" class="stat"><%= @user.followers.count %></strong></a></div>
次は先ほどの統計情報とフォローボタンを表示させるためのViewを追加します。
また、ログインしている人だけに表示させます。
app/views/registrations/show.html.erb
<section class="stats"><%= render 'users/shared/stats' %></section><section><%= render 'users/shared/follow_form' if user_signed_in? %></section>
次にfollow,unfollowのパーシャルを作成
app/views/users/shared/_follow_form.html.erb
<% unless @user == current_user %><div id="follow_form"><% if current_user.following?(@user) %><%= render 'users/shared/unfollow' %><% else %><%= render 'users/shared/follow' %><% end %></div><% end %>
次にfollow_form.html.erbで用意したパーシャルを作成するのですが、ajaxにするためremote:trueにします。
app/views/users/shared/_follow.html.erb
<%= form_for(current_user.active_relationships.build, remote: true) do |f| %><div><%= hidden_field_tag :followed_id, @user.id %></div><%= f.submit "フォローする", class: "follow-btn" %><% end %>
app/views/users/shared/_unfollow.html.erb
<%= form_for(current_user.active_relationships.find_by(followed_id: @user.id),html: { method: :delete }, remote:true) do |f| %><%= f.submit "フォロー中", class: "unfollow-btn" %><% end %>
followingアクションとfollowersアクション
ーーーーーーーーーーーーーーーーーーーーーーーーーーーーーーーーーーーーーーー
次の2つのアクションをshow_followページ1つで読み込むようにさせる。
app/views/users/registrations_controller.rb
def following@title = "フォロー"@user = User.find(params[:id])@users = @user.following.paginate(page: params[:page])render 'show_follow'enddef followers@title = "フォロワー"@user = User.find(params[:id])@users = @user.followers.paginate()page:params[:page]render 'show_follow'end
このアクションに対応するビューを作成
app/views/users/registrations/show_follow.html.erb
<div><h1><%= @user.name %></h1><section class="stats"><%= render 'users/shared/stats' %></section><div><h3><%= @title %></h3><% if @users.any? %><ul class="users follow"><% @users.each do |user| %><li><%= link_to user.name, "#" %></li><% end %></ul><% end %></div></div>
RelationshipコントローラでAjaxリクエストに対応
ーーーーーーーーーーーーーーーーーーーーーーーーーーーーーーーーーーーーーーー
まずは、Relationshipコントローラ作成
$ rails g controller Relationships
app/controller/relationships_controller.rb
class RelationshipsController < ApplicationControllerbefore_action :authenticate_user!def create@user = User.find(params[:followed_id])current_user.follow(@user)respond_to do |format|format.html { redirect_to @user }format.jsendenddef destroy@user = Relationship.find(params[:id]).followedcurrent_user.unfollow(@user)respond_to do |format|format.html { redirect_to @user }format.jsendendend
これらのアクションが呼び出すjs.erbファイルを作成
app/views/relastionships/create.js.erb
$("#followers").html('<%= @user.followers.count %>');
app/views/relationships/destroy.js.erb
$("#followers").html('<%= @user.followers.count %>');
以上!!!
これでできるはず!
人によってはDeviseの部分が違ったりしてくるのでそこは対応させてください。
また、レイアウトもしていないのでとても見栄えはよくないので自分なりにアレンジしてみてください。
ばいちゃ
めちゃ大変?1つ目のRailsポートフォリオ製作日記①
最近パソコンばかりで頭パンクしてしまいそうになったので、"Township"という平和な街づくりアプリをはじめました。
久々の更新です。
今日から1つ目のポートフォリオについて自分なりの感想を踏まえながら日記にしていきます。
さあ書いていこう!
結論
ーーーーーーーーーーーーーーーーーーーーーーーーーーーーーーーーーーーーーーー
めちゃめちゃ難しい。それに尽きる。
どうして?
ーーーーーーーーーーーーーーーーーーーーーーーーーーーーーーーーーーーーーーー
理由は3つあります。
1つ目は、単に自分自身の圧倒的な実力不足。
2つ目は、やるべきことが多い。
3つ目は、襲いかかるこれでいいのか?感
僕はこの3つが大枠の理由です。
しかし!!
ここからはその3つのような難しい要素を持ちながらやることがとても重要だ
。ということを書いていきます。
なんで重要なのよ
ーーーーーーーーーーーーーーーーーーーーーーーーーーーーーーーーーーーーーーー
まず1つ目から見ていこう。
取り組んでいく中で圧倒的な技術不足を痛感すると思います。
あれはなんだったっけ。このメソッドなんだよ。ウワァアとなりながら必死にググる。幾度となくググる。試す。1つ前に進む。
はっきり言ってこの繰り返しです。しかし、それを繰り返していく中で、次にエラーになった時に、このエラーはここが原因だ。とか、このエラーにならないためにこう実装していこう。などその都度その都度理解していき、勝手に知識が身についていく。
これが僕達みたいな未経験へっぽこには必要なやり方だと思います。
ここで1番ダメなのは、取り組む前からまだ技術不足だからもっと勉強してから取り組もう。ということです。いわゆる『わかってから始めたい病』。
そんなこと考えていたら、どんどん遅れていく。そして自分と同じ職に就きたい人たちにもどんどん抜かされていく。
僕は見えない競争だとも思っています。絶対に負けたくないって思ってやってます。
とりあえずやってしまおう!!ということ。
2つ目は
Railsチュートリアル以上にやらなくてはいけないことが多いということ。Railsチュートリアルに少し機能を追加した程度じゃ大した評価に繋がりません。
そこを軸にしていくのはいいですが、そこから機能どんどん追加してより自分らしいアプリケーションにしていくことが大事だと思うからです。
また、アプリの見た目も大事になってくるので、デザインもそれなりにやります。テストだってRspecで書いてデプロイはAWSでする。などやるべきことがたくさんあります。その都度やりながら学んでいかなくてはいけないのでとても難しく大変な作業です。
ですが、自分のアプリケーションを作っている時が何よりも楽しいと思えるのが僕の中での強みです。
3つ目は
常に襲いかかってくる本当にこれでいいのか?という恐怖感です。
コードを書いていきその先に起こることがまだ分からない中で本当にこれをしていいのだろうか。本当にこれでこの先で全てが動いていくのか。など恐怖感が常に背後にいます。
こいつが厄介ですが、ここでの解決策は1つ!
とにかくやってみること!これに尽きます。やはり恐怖は感じるけど止まってるより失敗して前に進んでいく方がいいし、何より成功するためにはやらなきゃわかんないからですね。
当たって砕けろ精神が今の僕にはあってるんだなと思います。
最後に
ーーーーーーーーーーーーーーーーーーーーーーーーーーーーーーーーーーーーーーー
今は30%ぐらいの完成度ですがまずは一気に完成まで持っていきそれからエラーに直接関わってこないデザインや、フォームなどを修正していき自分の中で納得できる1つを作り上げていきたいと思います。
明日からもどんどんいくぞ。ってことでバイバイ。